
How to Make a Wax Seal
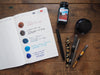
In case you missed it, we started carrying J. Herbin wax seal supplies in the shop a few weeks ago - I did a blog post on it, with more pictures of the different coloured wax in seal form. In that blog post, it was more about the final product than how to make the actual wax seal, so here's a post to help you out if you're not certain about what to do.  I had to enlist the help of Vanna (i.e. Jon) to help me with this post. If you receive a letter from us in the next few days that has an odd looking wax seal, it's because we used your envelope as our demonstration, and we had some "timing issues" with the pressure of wax cooling and me trying to take a photo. One day we're going to do a behind-the-scenes post of how these how-to blogs get done, with the dog sniffing the wax and the baby bobbling in the background and me trying to stop wax from cooling and Jon saying "Liz, this one is ruined." It's actually not too hard to do this. The idea is, you melt the wax onto the envelope, and you press your brass stamp into the wax before it cools, making an impression. You need: Sealing wax (available in different colours) Brass stamp (often people use a letter in their name or a symbol) Your envelope Heat source - here, a candle
  Step one: Hold the wax over the candle and rotate so too much wax doesn't drip into the candle.
  Step 2: Gently but firmly rub the melted end into the paper in a circle.
  It won't be pretty, but that's okay, because you're going to be putting more wax on it. It may also be a bit tacky or sticky as you rub, but don't worry about it.
  Step 3: Bring the wax seal back over the flame and repeat. The bit of wax on the envelope will be cooling while you are re-warming the wax stick, and that's okay. It's the first "layer" of wax, so when you press your stamp on, you don't press all the way to the paper, and you also get a nice, thick wax seal. When you add more wax to the bit on the envelope, use your stick to gently move the wax around to form a bit of a circle, preparing for the brass stamp.
 Your second glob of wax will look something like this - it takes a bit of trial and error to figure out about how much wax you like to have in your seal.
  Step 4: Wait just a bit, until the wax is just matte (and no longer shiny). Then, press your stamp into the wax firmly, and hold it for a bit, maybe around 5 seconds. If you press right away and the wax is too hot, it will be too soft and won't make a good, crisp impression.
  Lift carefully, and you'll have your seal!
  In addition to being able to use a candle, you can use a lighter with a long handle (like a barbecue lighter) or a torch type lighter. You can hold the wax directly onto the paper while holding the flame to the tip, and wait for the wax to drip drip drip onto the envelope. You may have to wait a bit longer for the wax to cool, don't rush it! (But don't take too long, or you won't be able to get your stamp into it). The reason for the second layer of wax is because if you don't get enough, it ends up looking a bit thin. You want the wax to come around all of the edges.
  You can also consider making a mark on your stamp itself so you always know which way is the top when you go to press it on - seconds make a big difference in the wax cooling!
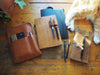
  Tip 1: When you're near the end of your wax stick, melt the end and stick it onto the end of a fresh stick. Tip 2: If you're new to this, always put the the wax seal on the envelope before you put on the postage stamp, so if you mess up, you don't waste the postage. Don't worry about getting it perfect, though :) We carry the sealing wax regularly in the shop - you can either try a stick of a colour, or if you know you like it, get a pack of four sticks. The brass stamp (either a letter or symbol) and the handle - purchased separately - are special order: if you're interested, send us an email (info at wonderpens.ca). You can see more details here. Above all, have fun with it!
I had to enlist the help of Vanna (i.e. Jon) to help me with this post. If you receive a letter from us in the next few days that has an odd looking wax seal, it's because we used your envelope as our demonstration, and we had some "timing issues" with the pressure of wax cooling and me trying to take a photo. One day we're going to do a behind-the-scenes post of how these how-to blogs get done, with the dog sniffing the wax and the baby bobbling in the background and me trying to stop wax from cooling and Jon saying "Liz, this one is ruined." It's actually not too hard to do this. The idea is, you melt the wax onto the envelope, and you press your brass stamp into the wax before it cools, making an impression. You need: Sealing wax (available in different colours) Brass stamp (often people use a letter in their name or a symbol) Your envelope Heat source - here, a candle Step one: Hold the wax over the candle and rotate so too much wax doesn't drip into the candle. Step 2: Gently but firmly rub the melted end into the paper in a circle. It won't be pretty, but that's okay, because you're going to be putting more wax on it. It may also be a bit tacky or sticky as you rub, but don't worry about it. Step 3: Bring the wax seal back over the flame and repeat. The bit of wax on the envelope will be cooling while you are re-warming the wax stick, and that's okay. It's the first "layer" of wax, so when you press your stamp on, you don't press all the way to the paper, and you also get a nice, thick wax seal. When you add more wax to the bit on the envelope, use your stick to gently move the wax around to form a bit of a circle, preparing for the brass stamp.
Step 4: Wait just a bit, until the wax is just matte (and no longer shiny). Then, press your stamp into the wax firmly, and hold it for a bit, maybe around 5 seconds. If you press right away and the wax is too hot, it will be too soft and won't make a good, crisp impression. Lift carefully, and you'll have your seal! In addition to being able to use a candle, you can use a lighter with a long handle (like a barbecue lighter) or a torch type lighter. You can hold the wax directly onto the paper while holding the flame to the tip, and wait for the wax to drip drip drip onto the envelope. You may have to wait a bit longer for the wax to cool, don't rush it! (But don't take too long, or you won't be able to get your stamp into it). The reason for the second layer of wax is because if you don't get enough, it ends up looking a bit thin. You want the wax to come around all of the edges. You can also consider making a mark on your stamp itself so you always know which way is the top when you go to press it on - seconds make a big difference in the wax cooling! Tip 1: When you're near the end of your wax stick, melt the end and stick it onto the end of a fresh stick. Tip 2: If you're new to this, always put the the wax seal on the envelope before you put on the postage stamp, so if you mess up, you don't waste the postage. Don't worry about getting it perfect, though :) We carry the sealing wax regularly in the shop - you can either try a stick of a colour, or if you know you like it, get a pack of four sticks. The brass stamp (either a letter or symbol) and the handle - purchased separately - are special order: if you're interested, send us an email (info at wonderpens.ca). You can see more details here. Above all, have fun with it!
Related Posts

March Currently Inked
Spring is here and with it I have filled my pens with some fall-inspir...
Currently Inked in February
It’s February, and here I am with a few new inks in my pens. J. H...
My 2021 Analogue System
I try to do this post every year, a look at what notebooks and plan...


